How to Create a Pinterest Pin Worth Sharing With These 6 Design Tips
Ready to learn how to create a Pinterest pin that stops people scrolling and grabs attention? You’re not alone if you’ve struggled to design successful pins that drive engagement. We’ve all been there—staring at a blank canvas, wondering how other creators make it look so effortless.
But don’t worry—I’ve got your back! With Canva, you can easily design professional-looking pins, even if you’re a beginner. Seriously, no design skills are required!

In this post, we’ll focus on how to create a Pinterest pin that your audience will love. You’ll discover tips and tricks to ensure your pins are visually appealing and effective.
So, are you ready to dive in? Open Canva, and let’s create some engaging Pin designs that look amazing and generate clicks and saves. Let’s do this!
This post may contain affiliate links. This means I get a commission if you purchase through my links at no extra cost. Read the full disclosure here.
Why choose Canva to create your Pinterest Pins?
When trying to learn how to create a Pinterest pin, I highly recommend doing it with Canva. Whether you’re a total newbie or a seasoned pro, it makes designing fun and straightforward. You’ll be amazed at how easily you can create a Pinterest pin that captures attention.
Here’s why knowing how to design a Pinterest pin with Canva can transform your content strategy:
Ease of Use
Canva’s drag-and-drop interface makes design super easy, whether you’re a beginner or a pro. No complicated software—just pure creativity!
You can quickly customize colors, fonts, and images to match your brand’s vibe. Adding your logo or URL for consistent branding is a breeze, making your Pinterest pins truly unique.
Professional Templates
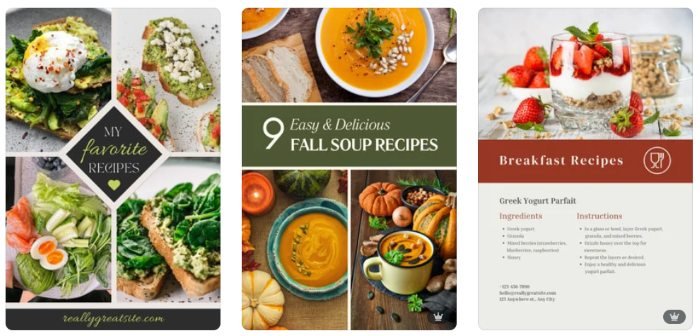
Feeling stuck on how to get started? No worries! Canva has thousands of Pinterest pin templates explicitly designed to catch the eye and drive engagement. You can find something for every niche and brand. Just pick a template, tweak it to your liking, and voilà—you’ve got a beautiful pin ready to go! Mastering how to create a Pinterest pin means modifying these templates effectively.
Expert Tip: Even if you’re on a tight budget, don’t underestimate Canva’s free version. It’s packed with enough tools and features to stand out in how to create a Pinterest pin that gets noticed. Seriously, no excuses, my friend!
With all these fantastic features, it’s no wonder most Pinterest creators use Canva. Let’s start by creating a Pinterest pin that turns heads, shall we?
Now that you’re all set up, it’s time to dive into the fun part—designing your first Pinterest pin. Ready to create something amazing? Here’s how to transform that blank canvas into a scroll-stopping Pinterest Pin that gets clicks. Let’s break it down step by step, focusing on how to create a Pinterest pin that truly stands out.
Getting Started: Setting Up Your Canva Account
If you don’t have a Canva account, you need to create one! Don’t worry—it’s quick and painless.
Go to the Canva website. You can sign up using your email, Google, or even your Facebook account—whatever’s easiest for you. If you already have an account, simply log in and get ready to start designing your Pinterest pins!
6-Step Process for Designing Eye-Catching Pinterest Pins
Now that you’re all set up, it’s time to dive into the fun part—designing your first Pinterest pin. Ready to create something amazing? Here’s how to turn that blank canvas into a scroll-stopping Pinterest Pin that gets clicks. Let’s break it down step by step.
Step 1. Choosing a Template
The first step in how to create a Pinterest pin is choosing a template that fits the purpose of your pin. Are you promoting a blog post? Showcasing a product? Announcing a sale? Canva has tons of ready-made Pinterest pin templates for each pin type, so you can start with one that fits your content. Choose a template that matches the feel and message you want to convey, and let’s begin.
Step 2. Customizing Text and Fonts
Now, let’s talk about the text—this is where you really start making your pin stand out.
Do you want to learn how to create a Pinterest pin that stands out and attracts clicks?
Choose bold and clear fonts. You want your headline to pop. Canva has plenty of font options, but remember: simplicity is key. Choose fonts that are easy to read and have personality—avoid making your audience squint to read your message. A mix of bold for your headline and a lighter font for the subtext is best.
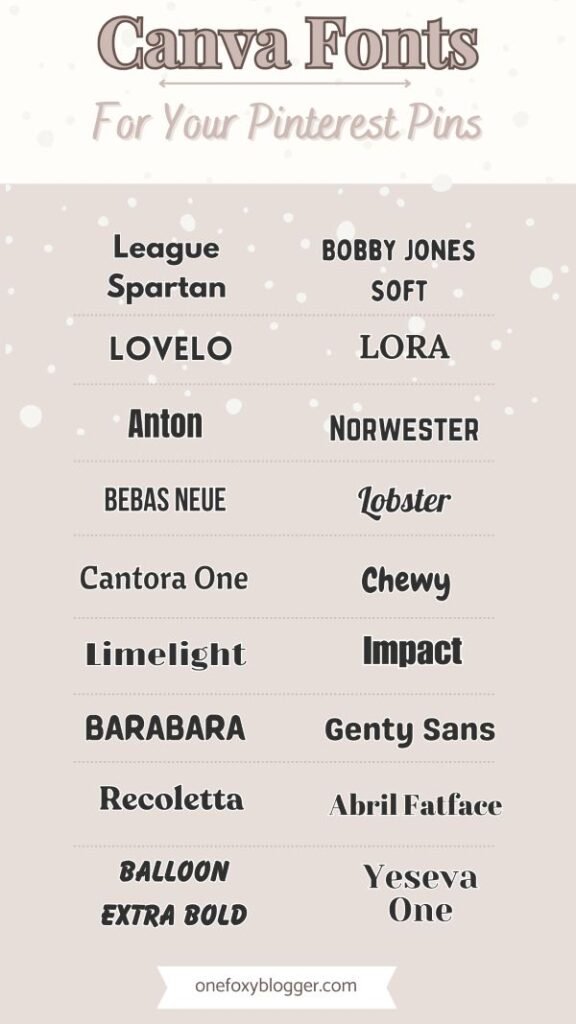
Positioning text for maximum visibility is crucial in how to create a Pinterest pin. Position your text where it’s easy to read, even on mobile. Remember, people scroll quickly on Pinterest, so your headline should be large and bold enough to catch their attention immediately. Try placing your text in the center or upper third of the pin to make it clear and brief.
Expert Tip: Keep it short and sweet—your headline should be readable at a glance. Use big, bold fonts to make your main message the star of the show. You’ve got this!
Step 3. Incorporating Images and Graphics
Next, let’s focus on how to create a Pinterest pin with striking images and graphics. Let’s add some visuals to enhance your design.
Uploading your own images: Do you have some gorgeous photos of your recipe or a sneak peek of your blog content? Upload them to Canva and incorporate them into your design.
Using Canva’s stock photo library: Don’t have your own images? No problem! Canva offers a fantastic collection of stock photos to bring your pins to life.
What Are Stock Photos
Stock photos are professional images shared on stock platforms. You can browse, download, and use them without special permission—unlike just grabbing random photos from the internet, which is a no-go because of copyright laws. Free stock photos don’t have copyright restrictions, so you’re good to use them in your pins or even videos.
Why Use Stock Photos in Your Pins?
- Stock photos are free! (Well, not all; there are also premium stock photo sites) But there are plenty where you don’t need to pay for a photoshoot or custom illustrations.
- Taking your own photos can save you time, but it’s not worth the effort in some niches. Stock images let you focus on your content instead.
- Get a professional look- Photography is an art—and if you don’t have the time or skills, stock images can give your brand that polished look.
- Create lots of Fresh Pins – Pinterest loves fresh pins, meaning new images for new and old content. Stock photos make it super easy to mix things up without taking endless photos yourself.
Adding graphics and elements: Spice things up with attractive graphics, shapes, and design elements. Canva has many icons, illustrations, and shapes that can enhance the appearance of your pin. Go to the elements tab and search for “doodles,” “arrows,” or “organic blob.” But don’t overdo it; just make sure they complement the design.
Step 4. Color Schemes and Branding
Colors can make or break your design, so consider how to create a Pinterest pin that incorporates your brand colors effectively. Here’s how to choose the right ones:
If you already have brand colors, now’s the time to use them. Make sure your pin’s colors align with your overall branding so it’s instantly recognizable.
If you’re unsure which colors to pick, Canva’s color palette generator is perfect for inspiration on how to create a Pinterest pin that pops. You can upload a photo or start with a base color, and Canva will generate a complementary color scheme for you.
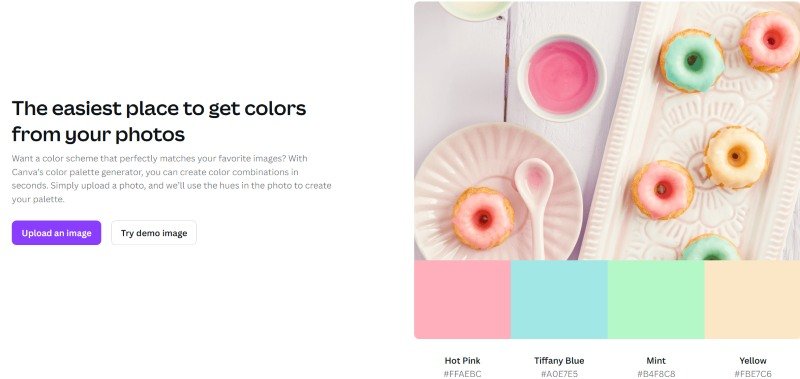
If you’ve reached this stage, I’m sure your pin already looks fabulous. You’re well on your way to creating a Pinterest pin that will be noticed. Ready to move on to the final touches? Let’s continue with some advanced styling tips.
👉Curious how to earn from the pins you design? My Pinterest affiliate marketing guide breaks it down.
Design Pinterest pins with Eye-Catching Design Elements
Now, let’s focus on how to create a Pinterest pin that gets noticed when you upload it to Pinterest. Don’t worry, it’s really easy.
With your basic design in place, it’s time to take it to the next level by adding those little touches that will make your Pinterest pin pop. You can use layering, effects, and bold colors to grab attention.
Step 5. Layering and Grouping of Elements
Want to make your design stand out and look professional? Layering elements is the secret sauce. This gives your pin a dynamic, almost 3D effect that draws the eye in and keeps people interested. Here’s how:
Layer images and text: Place text on a transparent overlay over images to create a sense of depth. Pins like these do very well on Pinterest.
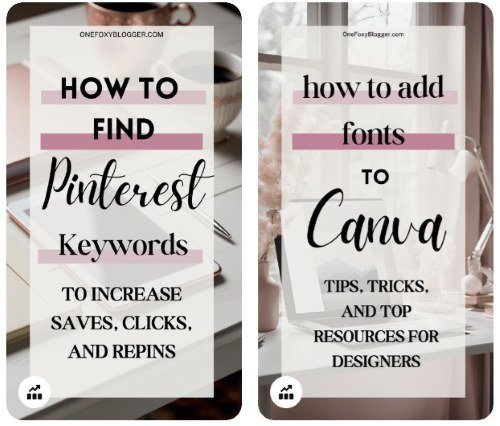
Group design elements: Canva makes it super easy to group multiple elements so they move as one. This is great for creating a cohesive design where everything works together seamlessly. Grouping can also help you resize everything at once for a polished look.
Step 6. Use Filters and Effects
Want to create Pinterest pins that pop off the screen? Added filters and effects is an easy way to do that.
Canva offers several filters that give your images a fresh, polished look. You can use a filter to brighten, saturate, or soften your images—whatever fits your style and brand well.
Sometimes, a subtle effect can make a huge difference. Try adding a soft shadow behind your text or an outline around key elements to make them stand out more.
By now, you should feel more confident in your understanding of how to create a Pinterest pin that stands out in users’ feeds.
Once you’ve learned the design basics, check out this Kittl tutorial to start generating Pinterest-ready affiliate images with AI.
6. Downloading and Uploading Your Pin to Pinterest
You’ve worked hard to create the perfect Pinterest pin, and now it’s time to load it to Pinterest. Let’s walk through downloading your Canva pin and uploading it to Pinterest. I promise it’s easy.
Downloading from Canva
Click “share” on the top right, and then “download.”
Next, you need to choose the best file format and resolution. Canva gives you a few file formats, but for Pinterest, the best choice is usually PNG or JPG. These high-quality file types will keep your design sharp when viewed on both desktop and mobile.
Make sure your pin is at a high enough resolution to avoid it looking blurry. You’ll want to download your pin at a high quality (Canva usually suggests the best resolution automatically) so that your design looks crisp and professional when uploaded to Pinterest.
Uploading to Pinterest
Now, let’s get your pin on Pinterest! This is where your “how to create Pinterest pin” efforts will pay off.
How do I add a pin? Some may think this is obvious, but if you’re not sure how to do it, here’s how.
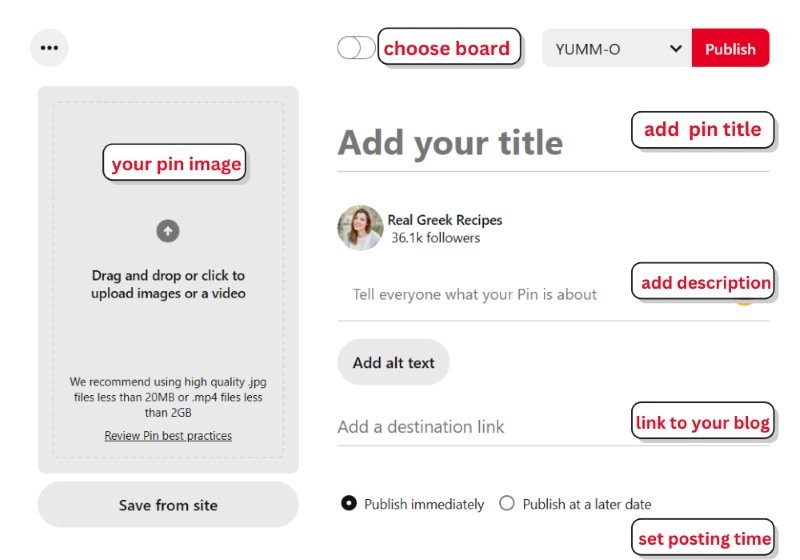
1. Create a new pin on Pinterest: Go to your Pinterest account and click the Pinterest menu sign in the upper left corner. Select “Create Pin” from the “Create content” dropdown menu.
2. Upload your pin: You’ll see a box that says, “Drag and drop your image.” Simply click on the area and find your newly designed pin file on your computer.
3. Write a catchy title and engaging description: The title and description are crucial for discovering your pin!
Write something that grabs attention while incorporating keywords related to your content. For example, if you’re sharing a blog post about Pinterest pin design, your title could be “How to Create a Pinterest Pin That Gets Noticed!”
4. Decide which board you would like to pin to. You’ll want to include relevant keywords and a call to action (CTA) in the description. Tell users what they can expect if they click through to your blog or website. Keep it short, sweet, and enticing!
5. Drive traffic to your blog post by adding its URL. Simply copy the URL of your blog post and paste it into the description box. This will ensure that anyone clicking on your pin is directed to your blog post.
Pro Tip: Schedule your Pinterest pins at the best engagement times using Pinterest’s built-in scheduler or a tool like Tailwind. Scheduling your pins at peak times boosts visibility and engagement. Using Tailwind to plan Pinterest content is an excellent way to maximize your efforts. Pin consistently, and watch your traffic grow!
GROW YOUR PINTEREST FOLLOWING
Get Your Free Pinterest Planner Now
Get ready to turbocharge your Pinterest game with our fabulous planner! Organize your ideas like a pro and map out your pins with style.
7. Common Mistakes to Avoid
Avoid these common mistakes if you want your Pinterest pins to perform well. But don’t worry—everyone makes these mistakes at first! Here are some tips to steer clear of these design traps. Let’s look at what to avoid and how to fix it if you’ve already made these slip-ups.
Overcrowding the Design
Sometimes, less is more. While adding as many elements as possible to your pin can be tempting, overcrowding the design can make it less effective. Use enough white space around text and images to keep things clean and focused.
Hard-to-Read Fonts
Fancy fonts are fun, but if they’re hard to read, your pin will not grab the attention it deserves.
Choose readability over fancy fonts: You want your audience to understand your message quickly—especially on mobile, where text is often smaller. Stick to bold, clear fonts that are easily read at a glance.
Test different fonts: Don’t be afraid to play with different font styles; make sure they’re legible. Canva offers great font pairings that work well together and ensure readability!
Ignoring Branding
One of the biggest mistakes you can make is not keeping your branding consistent. If your pins look totally different from each other, your audience has difficulty recognizing your content.
Keep things consistent across all pins: Use the same fonts, colors, and logo placement on each pin. It creates a cohesive look that helps you stand out. If you share multiple pins for the same post, try to make them look like part of the same collection.
It’s all about branding: People should instantly know it’s your pin when they see it in their feed.
To wrap it up
You’ve learned the ins and outs of how to create a Pinterest pin using Canva, from choosing the right template to optimizing your design for maximum engagement. Here’s a quick recap of the main steps we covered:
– Getting Started with Canva: Set up your account and pick a template that fits your purpose.
– Designing Your Pin: Customize text, images, and colors to make your pin pop.
– Adding Eye-Catching Elements: Enhance your design with filters and effects.
– Finishing Touches: Add your logo, make it mobile-friendly, and optimize your Pinterest to be SEO-friendly.
– Downloading and Uploading: Export your design and upload it to Pinterest with a catchy title and description.
See? You don’t need to be a designer to create stunning pins. You’ve got this! Canva makes the whole process easy and fun, and now you have the tools to make your Pinterest presence stand out by knowing how to create a compelling and engaging Pinterest pin.
If you want even more Pinterest tips and Canva tricks, be sure to subscribe so you never miss new content.
Get access to the Canva Creator Vault.
Join our mailing list and get instant access to the Canva Creator Vault — a growing library of FREE templates, cheatsheets, font pairings, planners, and more!
Feel free to comment below with your experience or any questions you might have. I’m here for all your Canva and Pinterest needs.
I can’t wait to see what you create. Remember, practice makes perfect, and the sky’s the limit with Canva by your side. Keep designing, keep learning, and most importantly, have fun!
![5 Effortless Steps to Crafting an Engaging Blog Newsletter [ a beginner's guide] 12 Girl typing newsletter on laptop](https://onefoxyblogger.com/wp-content/uploads/2023/03/crafting-newsletter-ft-768x403.jpg)
