How to start a blog with WordPress using this comprehensive tutorial
This post may contain affiliate links. This means I get a commission if you purchase through my links at no cost to you. Read the full disclosure here.
If you are hoping to find the quickest and easiest way to begin a successful blog, you’ve come to the right place. Whether you want to learn how to start a blog with WordPress just for fun or plan to make one for your business, I will show you how to do this quickly and with minimal effort.

I will help you through the setup process with several screenshots and WordPress blog examples. Just follow along, and we’ll get your new blog up and running as soon as possible.
What is WordPress, and how does it work?
In this blogging with WordPress tutorial, I will show you how to start a blog with WordPress from scratch. For this, we will use WordPress, a CMS (content managing system) used by most websites worldwide. Its software allows its users to create everything from a simple blog to a complex e-commerce store.
Why choose WordPress?
Many new bloggers ask the following questions:
- How to start a WordPress blog for free?
- How much does it cost to start a blog with WordPress?
- Is WordPress good for starting a blog?
WordPress is a free website builder that is easy to use. You don’t have to be a developer; even your grandma can manage a blog on WordPress. Not to mention you have access to all the free themes and plugins you can download to add extra functionality to your site.
I want to help you avoid common errors people starting a blog frequently make by choosing the wrong platform. I know it is tempting because many ask how to start a blog with WordPress for free. Starting a simple blog doesn’t need to cost you anything. The cost of creating a blog on WordPress.com is zero. But a free blog on WordPress.com does come with many limitations.
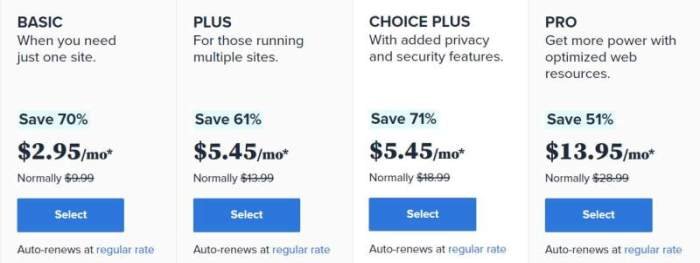
If you choose to go for a self-hosted blog instead, it will cost you no more than $3 monthly on services like Bluehost.
WordPress.com or WordPress.org.
Therefore, learning about the two platforms’ primary differences is helpful before you start. The names being very similar often causes confusion for someone who wants to create a blog.
In a nutshell, the key differences are:
WordPress.com
WordPress.org
Want to know more about the restrictions when using WordPress.com. See the infographic from WPbeginner.com
It is strongly recommended that you go with the self-hosted version of WordPress.org. There is more learning involved with managing your own site, but the fact that you have complete control makes it worthwhile. And it’s definitely worth the investment.
Now let’s get to work, and I’ll show you exactly how to start a blog with WordPress from scratch.
💕 Related reading: How to start a blog for free with Canva websites?
How to start a blog with WordPress step-by-step
1. How to find your niche
Choosing a profitable blog niche is the first step in learning how to start a blog with WordPress.
Your blog’s success will depend greatly on your chosen blog topic or niche. Some niches are in strong demand and covered by numerous other blogs, making it very difficult for you to succeed. On the other hand, you may have a very rare hobby you’d like to write about, but after you do some keyword research, you discover nobody is interested in it.
Ideally, you should create a blog with a topic with a sweet spot just in the middle. Your goal is to find a lucrative niche with low competition. Something popular enough to give you tons of monthly visitors but not so popular that there is no way for you to beat the competition. And for sure, you do not want to end up on the last pages of the Google search results.
If you have no clue what to create a blog about, do a Google search for untapped or untouched niche markets. That may give you some profitable ideas for your new blog. Lastly, to help you with the niche-choosing process, I recommend you watch the video from Gillian Perkins below. It may help you narrow down the perfect niche for you. And make sure to check out our post on choosing a niche where you can get 150 unique niche ideas.
2. Craft a profile of your ideal reader
In other words, who will be your target audience? Are you writing for young moms, or is your blog for tech geeks? When you know who you are writing for, it is easier to create valuable blog posts that answer specific questions they may have.
To create a reader profile
Write down and answer the following questions.
To delight your readers, you must provide them with the content they crave. By doing so, they will keep coming back for new content, resulting in a continuous flow of visitors who will enjoy your blog.
And as soon as these readers start sharing your compelling blog content on their favorite social platforms, your new blog will thrive!
Sounds good?😉
Then, let’s move to the next step.
3. What are your goals?
If you are curious how to start a blog with WordPress that makes money, the first step is determining the best way to monetize your blog. The best passive income stream for many blogs is affiliate marketing. Let’s say you create a blog website about yoga. You could promote yoga accessories like mats, clothing, and bags to earn a sales commission.
Some people make considerable money just by putting ads on their blogs or selling ad space. Alternatively, you can put your expertise to use and sell your writing or coaching services from your blog.
Get started setting your goals by downloading a free blog goal planner. This planner is available in our Freebie Library.
Next, I’ll explain the process of how to start a blog with WordPress using WordPress.org (the paid version).
4. Choose a domain name
One of the most important steps in this guide on starting a blog with WordPress is deciding on your blog’s domain name. This is the address that visitors use to access your blog. The blog name or title of your blog’s home page summarizes your blog.
One note on choosing a domain name and a blog name is that they do not necessarily need to be the same, but they are preferable; they are similar. Try to make your domain name something memorable and short if possible. And aim to keep it under 20 characters.
Try this blog name generator if you need inspiration for blog name ideas.
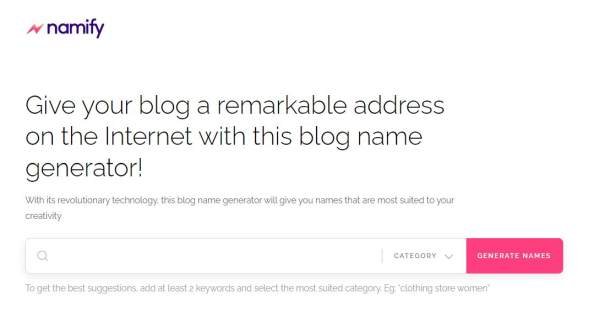
I suggest you choose a domain name that describes the topic of your content. However, many successful bloggers choose their name as the domain name to brand their blog.
You can do a domain search with Instant Domain Search to make sure the domain name you want is available.
If your choice’s name is unavailable, avoid using a version with dashes or punctuation. It may be confusing as most people use domain names without hyphens.
Once you’ve decided on a domain name, we can move on to the next step of how to start a blog with WordPress.
5. Find a web host
To start a blog, you will need a server to provide you with the space to house your posts and files. That is what a web host will do for you. But before you can set up your WordPress blog, you must purchase a hosting plan.
Choosing a suitable web hosting plan is generally confusing for newbie bloggers. Consider the things that are important to you. I highly recommend comparing price options and plans and the host’s reputation. You’ll want your host to be affordable, fast, and reliable.
Make sure to check if they include a free domain name and SSL certificate in their plan.
Your web server uses an SSL certificate to ensure secure communications online. Whenever someone visits your website, a secure encrypted connection is established. In a way, it works like sealing an envelope before sending it through the mail. You’ll know a site is secured with a digital certificate if the padlock icon appears next to the site name.
6. Install WordPress step by step
When you have signed up for your web hosting and chosen a domain name (with Bluehost, you get a free domain), the moment has come to install WordPress, and you can start building your blog.
Let me show you how to start a blog with WordPress and Bluehost. Because I am a Bluehost customer, I have access to their dashboard and tools, making it easier to demonstrate how to build a blog with WordPress using this web host. Bluehost has recently upgraded its design, making the site easier to navigate and more accessible.
First, you have to log into your Bluehost account. On the home page, click on the advanced tab in the menu on the left of your screen.
It will then take you to your C panel.
Now, you have to click on WordPress Manager by Softacolous under Software.

Click the Install Now button on the next page to start the process.

Under Software Setup, choose the domain name you want to use from the drop-down menu. No need to fill in the directory field.

Under Site Settings, give your site a name and a short description of the topics you write about on your blog.

Under the next tab, Admin Account, you fill in a username and a password. There is an indicator showing if your password is strong enough. Keep your credentials safe because you need them whenever you want to log in to WordPress.

The plugins tab, advanced options, and theme selection are optional, so we leave them for now. We can choose and set this up later.
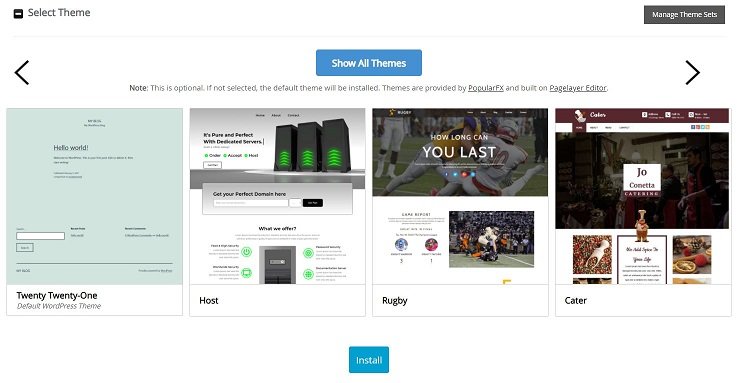
Now, you have the option to choose a theme. I suggest you leave that for the moment. WordPress will initially install its default theme on your new site. Hit the install button, and voila, you are now in the WordPress dashboard of your new website/blog.
Find a WordPress theme
Once you have set up WordPress, you can install a theme. A WordPress theme defines what your blog/website looks like. And, very importantly, how it performs. Every blog needs a theme to function correctly.
When you create a blog website and have to choose a theme, you may want to consider these points.
1. Mobile responsive (it looks good on all screen sizes)
2. Well-coded (Web crawlers can crawl your site efficiently)
3. Customizable (it has enough options to make the changes you want)
4. Compatibility with page builders (a page builder helps you design your site without the need to learn a line of code)
The number of WordPress themes available can be overwhelming. But I would go for a fast-loading theme to provide a better user experience to your visitors.
I recommend choosing one of the following themes. These are 100% free blog themes—they’re lightweight and fast and offer premium versions at reasonable prices.
- Astra theme by Brainstorm Force
- Hello theme by Elementor page builder
- Generate Press theme
- Kadence theme
💕 Related reading: Why the Kadence WordPress theme is my favorite theme.
Installing a new WordPress theme from the library
In the WordPress dashboard, go to Appearance and choose the first option, themes. Here, you can see the active theme installed and the additional themes you downloaded. Now you click add new at the top of the screen to go to the WordPress themes library.

All these themes are free for you to use. Choose the theme you want and click Install. Once you install the theme, you can preview it to see if it is the right choice. Next, you have to click activate to be able to customize it.
You should remember that having many themes you do not use makes your site vulnerable to hackers. To keep your site secure, keep your active theme and one of the latest WordPress default themes.
How to install a WordPress theme from a Zip file?
Now, of course, when you purchase a theme, you must upload it to your dashboard. How to do this? Simply go to Appearance> Themes > Add New > Upload Theme.

One note on uploading themes. Your new theme comes in a zip file that you can upload. Do not unzip the file, which will give you an error message. Once successfully loaded, you can click “Install Now” and activate it.
Activate your free SSL certificate
As I mentioned, Bluehost provides a free SSL certificate when you set up an account.
To get this free SSL certificate activated on your site:
- Log into your Bluehost control panel.
- From the side navigation, click the My Sites tab.
- Click the Manage Button for your site’s domain.
- Click the Security tab.
- Under Security Certificate, turn on Free SSL.
Once you’ve applied the SSL, it may take several hours to become active. Once activated, you can see the little locker icon before your URL in the browser’s search bar.
Essential plugins a blog cannot do without
Plugins are software plugged into your WordPress site to add extra functionality. Over 50.000 plugins are available for WordPress, making it difficult for newbies to decide which plugins to choose. I understand how tempting it can be to install many plugins, each of which will make your job as a blogger easier.
However, here is a brief warning in place. Installing too many plugins can slow down your site, plus a poorly coded plugin has an increased chance of causing incompatibility issues and crashing your website.
My favorite WordPress plugins are:
- My SEO plugin of choice is Rankmath, which analyzes and optimizes content for search engines. It’s definitely worth getting the Pro version.
- A plugin that makes automatic backups to safeguard my content. I use UpdraftPlus.
- A caching plugin to speed up my WordPress blog, I use WP Rocket.
- A security plugin to protect my site from malware and brute force attacks. I use All In One WP Security & Firewall Plugin.
- A social sharing plugin, for instance, Social Warfare, to drive more traffic to my blog.
- Google Analytics plugin tracks visitors’ behavior and traffic stats. I also use Clicky.
- A spam-blocking plugin like Akismet to identify and eliminate spam comments.
Go to your WordPress dashboard and press plugins to install a new plugin. On the plugins page, you see all the plugins currently installed on your blog. At the top, click “Add New” to search for new plugins.
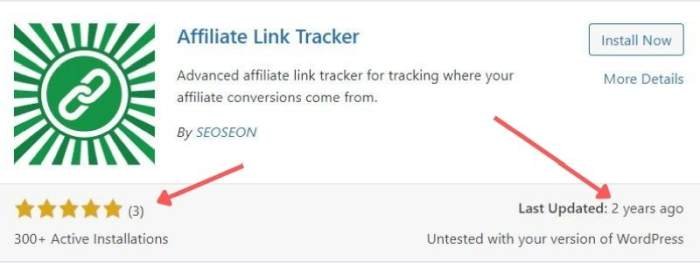
Avoid installing plugins that have not been updated for a considerable time, have many bad reviews, and are incompatible with your WordPress version.
How to set up an email address for your business
An email address with a domain looks more professional and makes you look more credible. Your visitors are more likely to trust you than when you use a free email service like Gmail or Yahoo. In practice, email newsletters sent from free mail accounts are more likely to end up in the subscriber’s spam folder.
Read also: 15 Ingenious Email Marketing Tips for Beginners That Are Super Easy to Learn.
Creating a new email address with your domain name is simple. Login to your hosting account, and in the c-panel, you should find the tab “Email Accounts” under Mail. Here, you can enter the details of your new mail account and click “Create.”
Now, it’s time to write your first blog post.
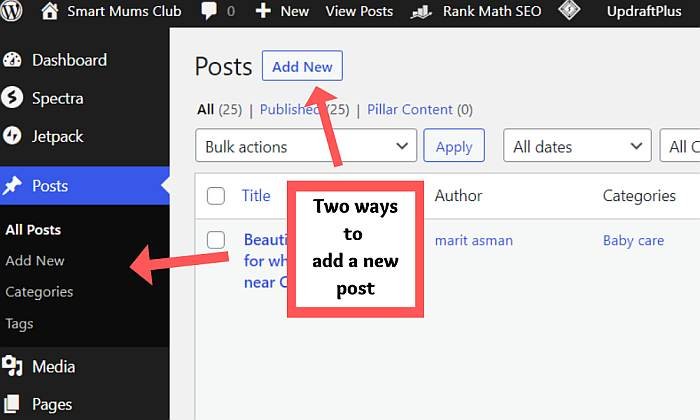
In this tutorial about how to start a blog with WordPress, we have reached the moment where we can add our first blog post. In your WordPress Dashboard, navigate to the “Add New Post” section once you decide on the first blog post you’d like to write. Click the “New Post” button to begin writing your masterpiece!
Here is what you will see when you choose Posts > Add New:
Next, you’ll see a brand new blog page that looks like an all-white page.

Take the time to learn how to write a headline that’ll hook readers. An excellent headline tells your readers what to expect and what you will help them with. If you have a headline, “7 tips for better sleep,” your post should deliver as promised, or your readers will quickly lose interest and leave.
If you are looking for blog title ideas for your topics, many blog title generators can help. One of my favorite tools for this is CoSchedule. When you use the CoSchedule Headline Analyzer, it asks you to enter a headline you are considering using. With the help of a database, you can identify headline types that have performed well in the past. Through this tool, you can create engaging headlines as it tells you the right words and optimizes character length.
Another way to learn how to write a strong title is to observe the headlines of other successful bloggers in your niche.
If you are happy with your headline, fill out the “Add title” bar on your new post page with an appropriate title…

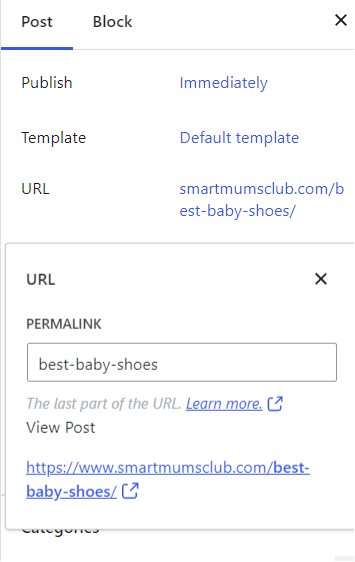
Make sure the URL of your blog post is SEO-friendly.
For your new post to rank well in organic Google search results, you must customize the URL (blog link). WordPress will automatically use your posts’ titles as the URL. You can change that by clicking the URL and inserting your SEO-optimized key phrase in the box, as you can see here. As you can see, I changed “best baby shoes for summer, breathable and lightweight” to “best baby shoes.”
Writing the post content
You can write a draft in one sitting or work on parts of your post gradually as you write it. It allows you to review and refine your work before coming up with the final version. You can also use this strategy to break up a large project into smaller tasks and make it more manageable.
Using a blog post template is another way that can help you get started. For example, the template can give you an outline of the sections to include, such as an introduction, body, and conclusion. Head over to Wordstream and download 9 free blog post templates that will help you drive traffic to your blog. These can be very useful when you are just starting out.
Create an engaging introduction for your blog post
Which part do you think is most important in your article or post? Precisely, the first paragraph!
Pay special attention to the introduction paragraph. To explain your story to your readers, you need an engaging introduction.
Aim to make it a priority when writing your posts. It’s like the first impression when meeting someone; it’s the reader’s first glimpse of your work and can either draw them in or turn them away. If you can capture their attention in the introduction, they’ll read your post.
Moreover, by writing a clear introduction, you can help Google figure out what the post is about and get your website ranked higher.
Here are three tips for writing an introduction:
- If you want to make your introduction SEO-friendly, your focus keyword should be in the first paragraph. Make sure your readers know they’ll find what they need immediately.
- Give a brief description of what readers can expect when reading your post.
- Last but not least, how will reading your content benefit them? Emphasize how your info will make their lives easier.
Make your text more readable by using subheadings.
It can be intimidating to look at a lengthy paragraph of text on your blog, and it might cause people to leave. Consider adding different subheadings to your post. For example, if you have a blog post that is 2,000 words long, it might be helpful to include 3-4 headings or subheadings throughout the post to make it more digestible.
Related topics for how to start a blog with WordPress:
- 17 Best Blogging Tips for Beginners to Jumpstart Your Blogging Career
- The ultimate list of resources for bloggers (free & paid).
Add relevant images.

Images can enhance your post, improve the flow of content, and explain complicated topics in a captivating way. For instance, adding screenshots or diagrams can help your readers better understand the steps if you describe a process.
Remember to add a featured image. What is a featured image? A featured image is prominently displayed on a website or blog post. Typically, it appears at the top of a page to attract the reader’s attention. Your website uses featured images in many places, such as archive pages for categories and related posts widgets.
But also, when readers share your blog post, most social sharing sites automatically pull the featured image to display with the link.
The right sidebar is where you can add your featured image, set the category for your post, and add relevant tags.
Before you hit publish
You are almost ready to publish if you have completed your first blog post, which ideally has at least a thousand words!
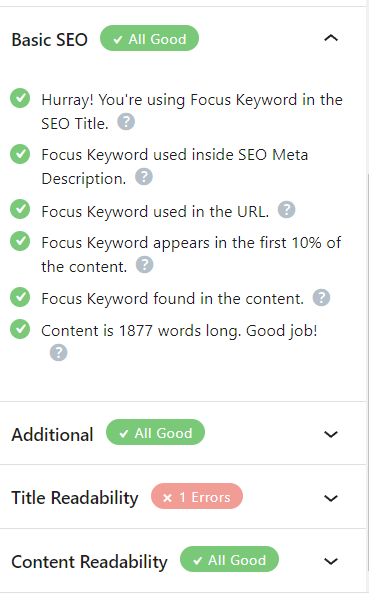
Double-check Yoast or Rankmath SEO suggestions. That is if you have an SEO plugin like Yoast or Rankmath installed, which I highly recommend! This ensures your blog is SEO-friendly. Check out the screenshots below, how Rankmath gives you SEO suggestions. I use Rankmath on this blog, which is just my favorite.
With everything set up, you can add more content to your blog. In addition to writing blog posts, you should also add a few static pages.
The primary pages a blog should have are:
Websites usually place links to these pages in the Footer Menu at the bottom of their pages so that they are always readily available.
Earning money with your blog
So, let’s move on to the last step. How to start a blog with WordPress and make a serious income.
Setting up a blog is easy, and the platform has many tools to help you monetize your content. With WordPress, you can make money in dozens of ways.
The problem is that you cannot expect to make money right away unless you have an existing audience somewhere already. Currently, monetization isn’t your top priority, but it should be one of your goals.
Also, monetizing your blog depends on the type of blog you have. For instance, if you have a health and fitness blog, you could monetize it by selling courses and memberships. But if you have a travel blog, you may become an affiliate of tour operators or partner with hotels directly. But it’s good to know how you want to make money blogging before you start, especially if passive income is your priority.
Learn more about this at:
- Easy Ways To Earn With Adsense From A WordPress Blog
- A foolproof guide to affiliate marketing for bloggers [to build a passive income]
- How To Set Up Affiliate Marketing For Amazon Quick And Easy For Beginners
- Make Money Blogging: 11 Ideas for Monetizing Your Passion
After this extensive tutorial, you should now have a solid grasp of how to start a blog with WordPress. If you still have any questions, please don’t hesitate to ask in the comments section below. I’m here to assist if you encounter any difficulties.


