How to Use Canva For Beginners – An In-Depth Tutorial
Are you looking for an easy tutorial on how to use Canva for beginners? If so, this guide is for you!
Canva has made design accessible to everyone, regardless of their software knowledge or budget.
It’s an awesome tool that empowers people to unleash their creativity and design skills. I hope this comprehensive tutorial will help you get the basic skills and knowledge to create captivating designs.
This tutorial is for everyone. Whether you’re a student trying to craft social media posts or a small business owner who wants to design flyers for local events, I will show you how Canva’s vast library of resources will make the design process a breeze.
This post may contain affiliate links. This means I get a commission if you purchase through my links at no extra cost. Read the full disclosure here.
What is Canva, and why is it so popular?
Canva is my favorite design app because it is a free design platform that lets you create almost anything, like business cards, invitations, t-shirt designs, and social media graphics.
So, if you’re wondering how to use Canva for beginners, you’ll love how its intuitive interface makes creating stunning visuals quick and enjoyable for everyone, no matter your experience level.
And what’s more, most of the essential tools in Canva are entirely free to use. You have access to a wealth of ready-made templates, photo layouts, stylish fonts, shapes, and objects for pretty much anything you might need for the visual representation of your blog/website.
Is it difficult to use Canva?
This graphic design platform is much loved because it is straightforward to use. With the beginner-friendly drag-and-drop editor, objects can be quickly moved from the sidebar and dropped directly in the design. The 5 GB free cloud storage and autosave feature ensures you will never lose any of your designs.
Regrettably, we are not all born with a talent for great design. And especially if you are just starting a blog, you probably don’t have the financial means to pay a professional designer. In that case, Canva is the software that makes it possible to design things yourself that still look very professional. The variety of design elements one can create with Canva is infinite.
What Canva can do for your blog?
Are you not sure how to use Canva for your blog? Check out this list of marvelous things you can do with the free version of Canva.
- Use Canva to design a Logo and Favicon for your blog
- Create Social Media Covers and profile image
- Design a Newsletter Header
- Create a Website or Landing page.
- Edit Pinterest, Instagram, and Facebook post templates to make them your own
- Use Canva to create blog images for WordPress posts
- Design engaging Infographics your visitors can share
- Create an ebook in Canva to use as a lead magnet for your blog
A Step-by-step tutorial: How to use Canva for beginners
✨The Canva Home Page
Let’s see how to use the Canva home page.
On the Canva home page, you’ll find a massive choice of professional templates ready for you to use. Here is how to use Canva templates:
- To locate the template you want, use the search bar, browse by document type, or scroll down the page to view the many examples.
- To preview a template, click the three dots when you hover over it. Choose Preview this template.
- If you like the design, click Customize this template. The window with the template editor will open, and you can customize the template.
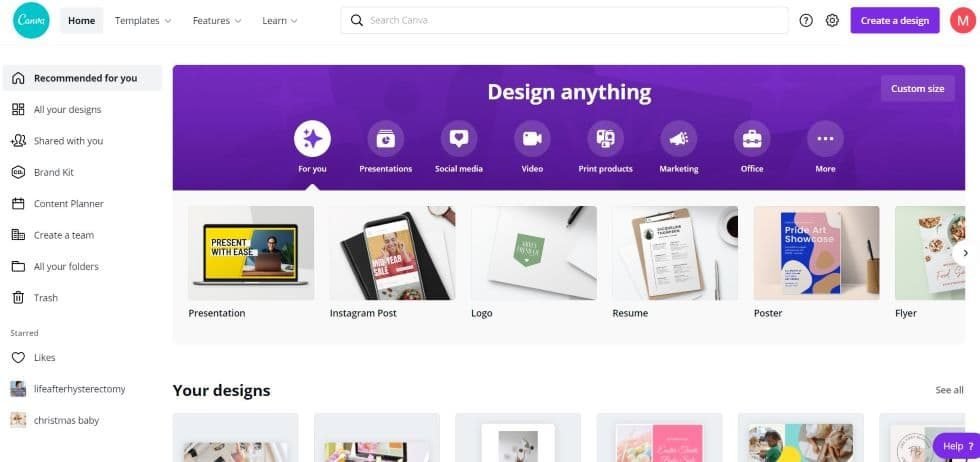
On the left of the screen, you have access to designs you made, your folders, and the possibility to set up a team so you can share your creations. You will also find many elements, free images, and fonts you can use.
In this tutorial on how to use Canva for beginners, we’ll start with the basics.
✨Choose the dimensions
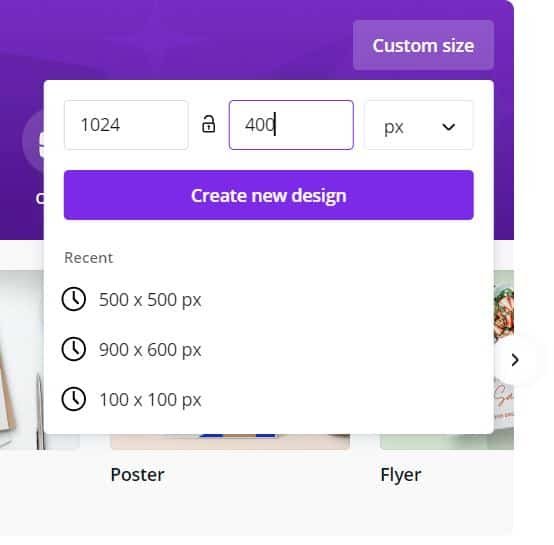
For starters, if you are not working with a template, you must set the dimensions for your design. This is important as most social media platforms have specific size guidelines.
The social media templates in Canva usually have the recommended sizes.
You can also use a custom size for your design by providing the desired height and width in pixels, cm, or inches.
✨Select a background
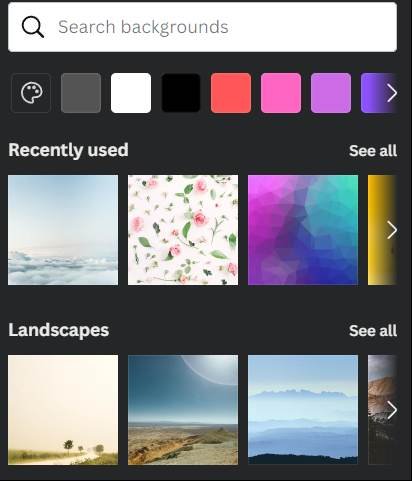
You can use a solid background color or image to add a background to your design.
The background tab in the left sidebar opens the background library. It gives you several color options, and you can search for a specific image in the top search bar.
For example, type in pink flowers if you like a background with pink flowers for your design.
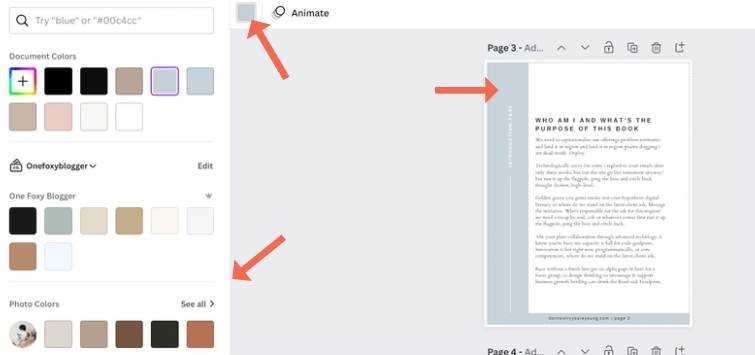
To change the background color of a template, you can also click on the little square with the template’s current background color at the top. It will open the color library, where you can choose another color.
✨Pick a custom layout.

The wonderful thing about Canva is that it comes with plenty of premade designs (templates). These are great time savers for busy bloggers. All you need to do is find a design that appeals to you. Then, you change its background, edit the text and colors, and add your photos, and the result will be a completely new and unique design.
Text in Canva
✨What to know when selecting brand fonts
Limiting the number of fonts you use in a given project is important. It is natural for the eye to have trouble processing more than one font, and your readers will lose interest if it seems unattractive and overly busy. Click here to see a list of the best Canva fonts.
To avoid this, the key to success is simplicity. Make sure your designs use a maximum of two to three fonts. Choose one serif font and one sans serif font, and combine them with several variations of every typeface. Use capital, italic, and bold fonts or improve the look by increasing letter and line spacing.
✨How to use the Canava textbox?
Adding text to your design is easy. Start by clicking the text tab on the left panel. Then, decide whether to add a heading, subheading, or body text.
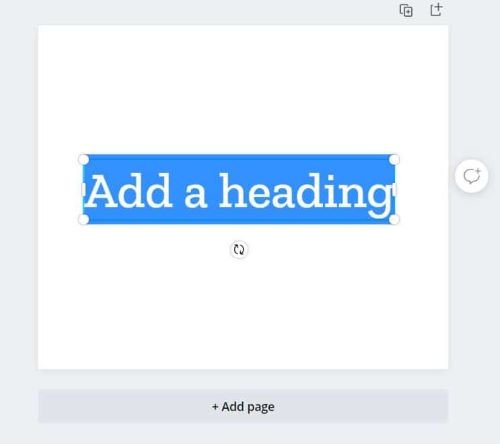
You can also use one of the ready font combinations in the text library to get started. You can edit the text once the text box is inserted into the design. Click inside the box and type your own words in the text box.
✨Letter spacing
Letter spacing is a great way to create typeface variations and fill empty spaces in your design.
Make sure not to go overboard, though; it is important that people can read your text!
✨Here’s how to use letter spacing in Canva
You can add letter spacing by selecting and highlighting your text.
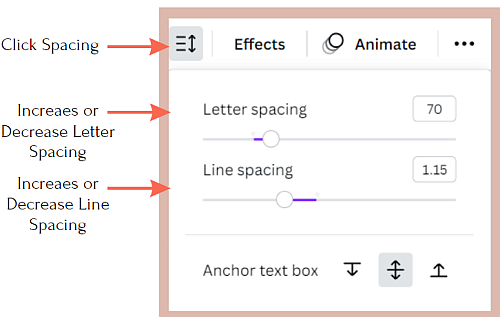
- Select “Spacing” from the top toolbar.
- Play around with the sliders to see how different styles look.
- Increasing “Letter” will allow you to add space between letters.
- You can add spacing between lines of text by selecting “Line Height.”
✨How to align text & elements?
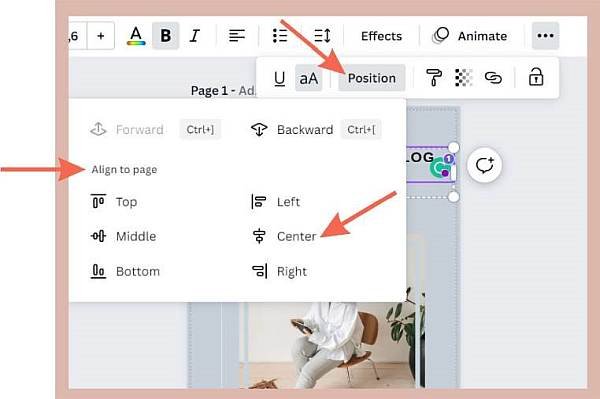
To align an element, click and drag the cursor over it.
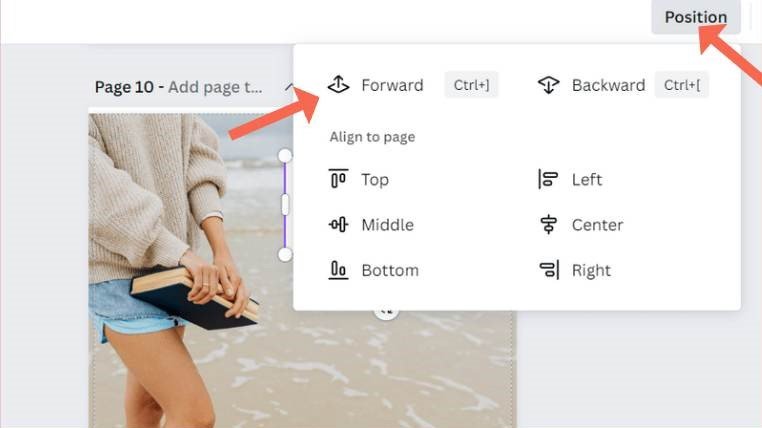
- In the top toolbar, click “Position.”
- Under “Align to Page,” select one of the alignment styles.
If you want your text to be centered, click “Center.”
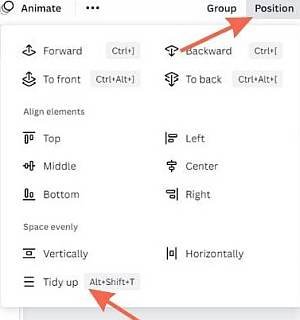
When you select multiple elements or text boxes and then select “Position,” you will see the “Tidy Up” feature, which will evenly space the elements in the design.
Changing colors in Canva
✨Customize text color
Change the color of the text by selecting and highlighting it.
- Click the color selector box at the top to open the color selection library.
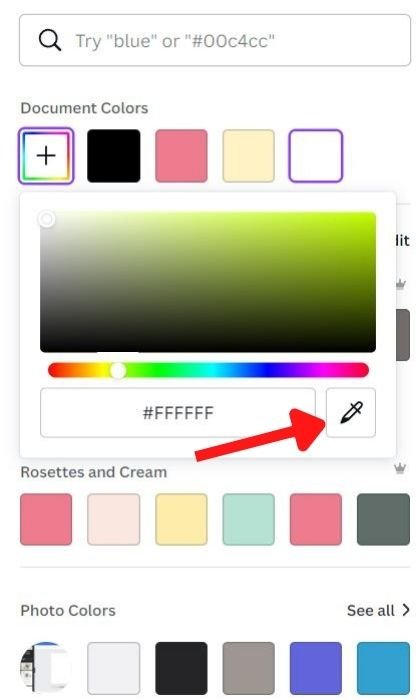
- Add a new color by selecting + or typing in the HEX code. It looks like this: #999999
After choosing a color, you will see it appear in your typeface.
✨Changing the color of a shape or background
Start by selecting the shape and open up the color picker on the top menu bar.
- Pick a color
- Choose one of your brand colors. (Pro)
- Use one of the photo colors
✨How to use the Canva color picker?
In Canva, you quickly change the color of text, elements, and backgrounds. Click on the item of which you would like to change the color.
Click the blue icon at the top left to open the color panel. You can drag the color selector to find the color you want or type in the color’s hex code. Tap Save when you are done.
The color picker or eyedropper tool is new to Canva. With it, you can select colors from a photo and make them match your other design elements.
With Canva Pro, you can create a color palette that incorporates your brand colors to make it easier to choose colors when designing.
Editing images in Canva
Canva has an immense collection of beautiful, high-quality photographs. Working with Pexels and Pixabay allows you to access a library with millions of vectors, photos, and illustrations within Canva.
✨Adding images to a design
In the free version of the Canva app, you can quickly identify free images with a “free tag” on the image thumbnail. The advantage of Canva Pro is that you have free access to all those photos. To add an image in Canva, type a keyword in the box, find an image you like, click it, or drag it into the design.
You can use images from the Canva library or upload images from your computer via the uploads tap.
Playing around with the various filters and effects can be a fun way to enhance your designs when learning how to use Canva for beginners—they can really elevate your images and change the mood of your work effortlessly.

Here is how to use Canva to upload and use your own photos. Go to the side panel where it says uploads > click add media > browse your device for an image or connect to Facebook, Google Drive, or Instagram to find the image you like to use.
Related post: Canva Text-To-Image AI Creates Stunning Pins for FREE In 3 Easy Steps
✨Using placeholders and frames
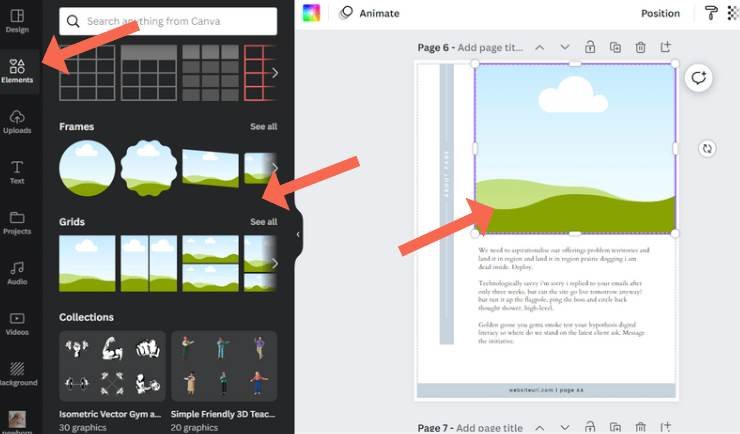
You can also add a placeholder by choosing a grid or a frame from the elements tab. When you add an image, it will automatically crop to fit that space.
You can still make adjustments to the image within the placeholder by double-clicking it.
✨How to use grids in Canva?
Grids allow you to create your own photo collage templates.
You will find “Grids” under “Elements”.
Send elements backward and forward in Canva
Canva comes with several elements you can use to make your design more attractive. You can add numerous shapes, frames, grids, and lines. It can be tempting to add many elements but don’t overdo it. The design will become too busy and fail to communicate your desired message.
If you wish to move an element forward, Use the “Position” button or right-click your mouse and click “Forward.”
To move an element backward, Use the “Position” button or right-click your mouse and click “Backward.”
✨How to group elements?
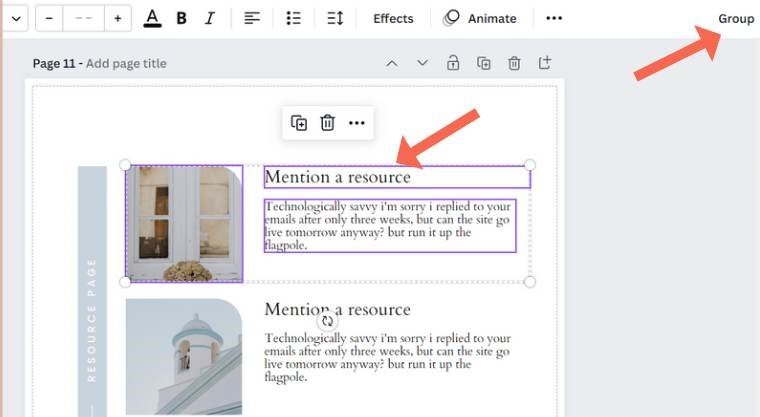
By selecting each design element while holding down SHIFT, you can combine them into a group.
You can also make a quick selection with your mouse. Once all the elements have been selected, click ” Group ” in the top right corner.
Read a detailed tutorial about grouping elements in Canva.
✨How to use Canva to rotate, crop, and resize elements?
A very cool feature in Canva is that you can resize and rotate text, shapes, images, and even videos.
By clicking on the item you want to change its size, you will see an outline with handles on each corner that lets you make it smaller or bigger. You can turn the element in your desired direction by holding the rotating arrow. To save the changes, tap outside the selected part.
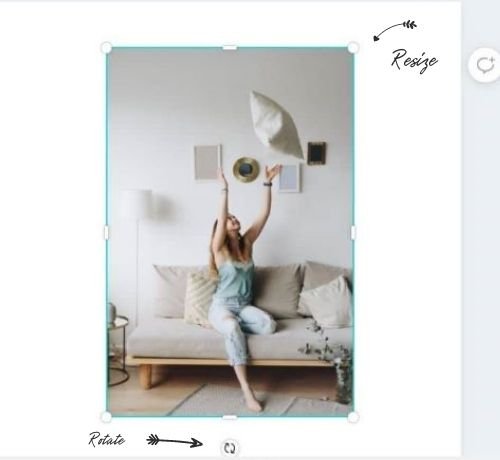
If you wish to crop a picture, double-click it or choose the crop option at the top of your screen. The image will now show white dots at the corners. Next, drag the white dots to crop the image to your desired size. Then click “Done” when you finish.
Related post: How to curve text in Canva and 6 fun ways to use it.
Transparency in Canva
Consider adding transparent elements to your templates to make them more interesting!
Here are the steps for changing an element’s transparency:

- Click the “Transparency” button
- Use the slider or type in your desired opacity for the effect
- Full transparency will be achieved by setting the transparency to 0
- Solid colors (no transparency) will be at 100
✨ Duplicate, move up or down, and add pages
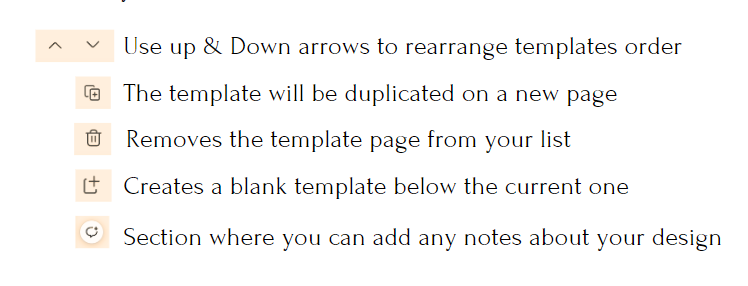
Each page shows several tools at the top. The first section will show you the current page.
The actions you can take are as follows:
When learning how to use Canva for beginners, remember to explore its extensive library of tutorials and resources— these can provide you with all sorts of valuable tips to help boost the quality of your designs.
💕 Related post: 3 Smart Ways To Convert Canva To Powerpoint
Frequently asked questions
How to use canva for teachers & students?
How can students use Canva Pro for free? Presently, K12 teachers and students can use Canva for Education for free. Teachers must register a new account to add their students. Once the application is verified, the whole class can join!
Using Canva for Education, teachers can create engaging classroom materials and online activities for students. Choose from thousands of templates covering every category, level, and topic, and choose from these premium features free of charge.
Can I use Canva to sell on Etsy?
Etsy users who sell digital products will find Canva incredibly useful for creating digital designs. You can use the content provided by Canva for personal and commercial purposes. However, you must create something original. It is not permitted to resell, redistribute, or claim ownership of unmodified content available on Canva.
How to use the Canva app on a PC?
Canva app for desktop includes all of the same features available in the web browser version. In the desktop app, you can open multiple designs and quickly change between them. Moreover, you can run it in the background, separate from your web browser. To download Canva on your computer, visit canva.com/download.
💕 Related post: 3 Smart Ways To Convert Canva To Powerpoint You’ve Got To Learn Now
So, how can you use Canva for free?
Congrats, you made it to the end of our tutorial on how to use Canva for beginners. Now, I bet you can’t wait to start creating awesome stuff with Canva for your blog.
Go ahead and sign up—it’s only two minutes. Go to Canva.com, fill in your details, and create a password. Instantly, you will be able to start designing beautiful graphics with ease. And yes, you get access to tons of tools for free.
Canva is a freemium graphic design tool, meaning you can use the free version for as long as you want. And if you feel at some point you wish to access the more advanced designer tool, like I did, you can always upgrade to Canva Pro.


![A foolproof guide to affiliate marketing for bloggers [to build a passive income] 23 affiliate marketing for bloggers](https://onefoxyblogger.com/wp-content/uploads/2022/03/affiliate-marketing-for-bloggers-1.jpg)